Fields in salesforce
Fields;-
- A field is like a database custom object fields store the data for our object records.
- Custom object automatically include some standard fields .
Created by
Last Modified by
Owner
Record Name
- Create custom fields to store additional information.
There are two types of fields
- Standard fields
- custom fields
Standard fields;-
- we cannot delete standard fields
- we cannot create any more standard fields
- Don't have API Name
Custom fields;-
- We can delete custom fields
- we can create more custom fields
- Have API Name.
API means Application Program interface
Field Name = Active
API.Name = Active__c
Path for creating fields for standard objects;-
Setup
Customize
Select the object
Click on fields
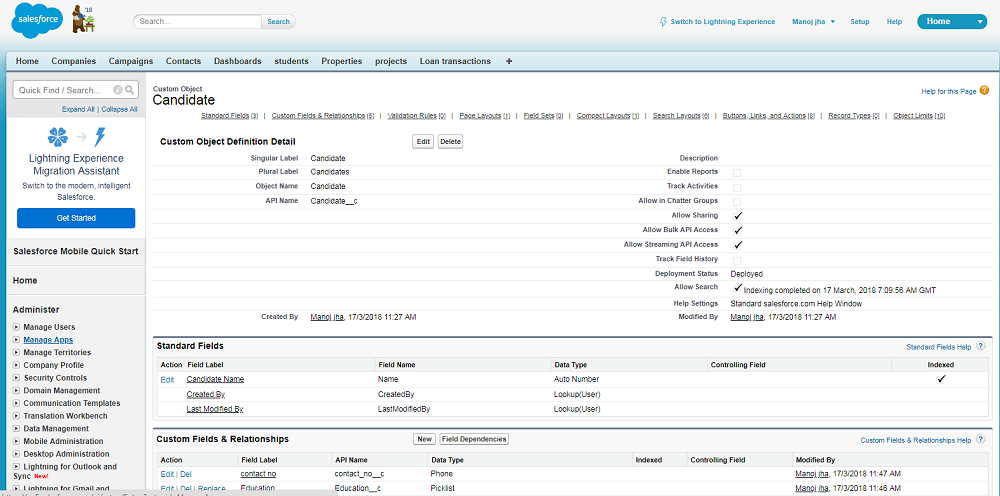
Go to custom fields and Relationships
Click on "New" button
Steps for creating a field;-
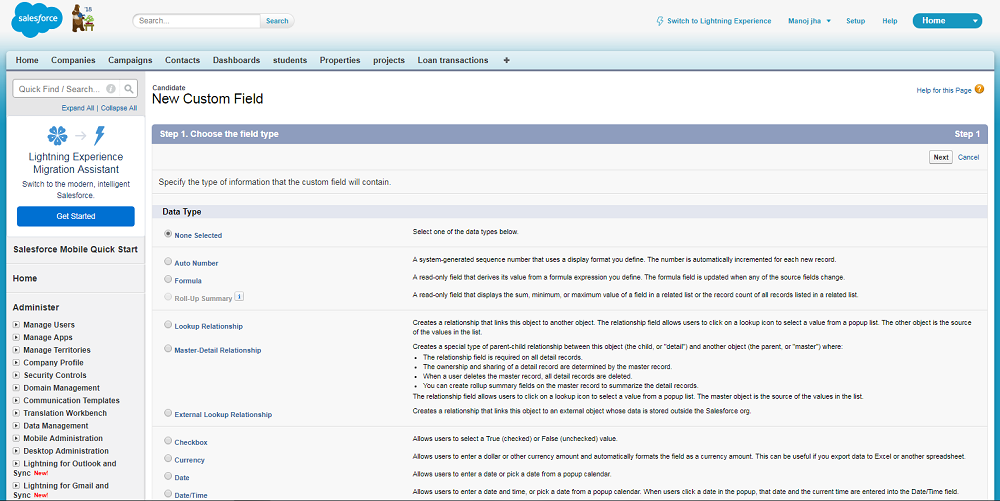
Choose the field type Which specifies the type of information that the custom field will contain.
1. Auto Number;- A system generated sequence number that uses a display format we define.The number is automatically incremented for each new record.
Ex;- If the display format is Acc- {000}
Starting Number = 000
2. Checkbox;- Allow users to select a True (Checked) or False (Unchecked) value.
3.Currency;- Allows users to enter a dollar or other currency amount value and automatically formates the field as a currency amount.
4. Date;- Allows users to enter a date or pick a date from a popup calendar
Ex- 5/4/2018
5. Date/Time;- Allows users to enter a date and time, or pick a date from a popup calendar when users click a date in the popup that date and the current time are entered into the Date/Time field
Ex; 3/4/2018 12;50 PM
6. Email;- Allows users to enter an email address, which is validated to ensure proper format
Ex- abc@gmail.com
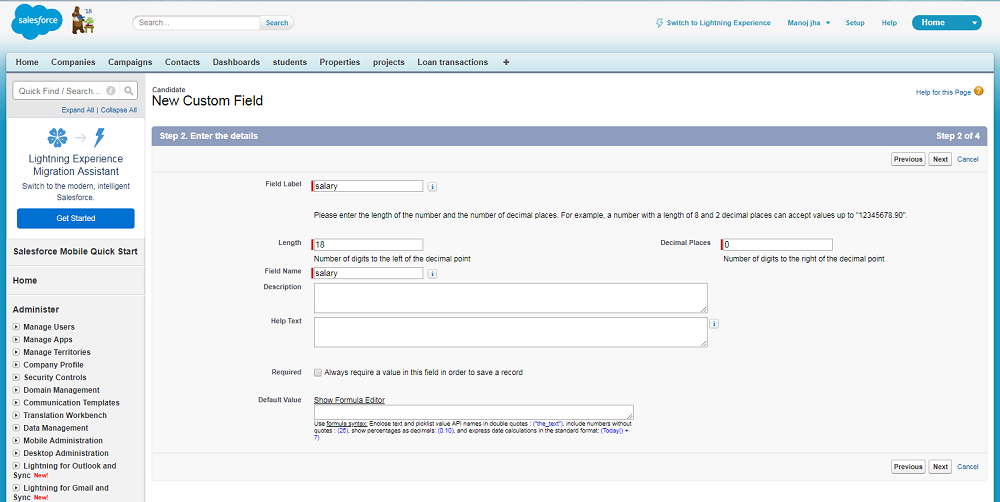
7. Number;- Allow user to enter any number leading zero are removed.
we can enter upto 18 digits
8. percent;- Allows users to enter a percentage value.
9. Phone;- Allows users to enter any phone number.
10. Picklist;- Allows user to select a value from a list we define.
11. Picklist(Multi select);- The picklist (Multi-select) field allows user to choose more than one picklist value from a set of predefined text values.
12. Text;- Allow user to enter any combination of letters and numbers
13. Text Area;- Allow user to enter any combination of letters and numbers on separate lines.
14. Text Area(Long);- The Text Area(Long) provides for the storage of upto 32,768 characters that display on separarte lines
15. URL;- Allows users to enter any valid website address.
16.Text(Encrypted);- Allows users to enter any combination of letters and numbers and store then in encrypted form.
Step 2;-
1. Give the Field label with meaningful name, once you click Tab, then Field Name will be automatically populated from the label .
enter the description for the field which describes about the purpose of using that field.
Help Text;- It is possible to add field level help to a custom field to provide information to users on how to use that field.
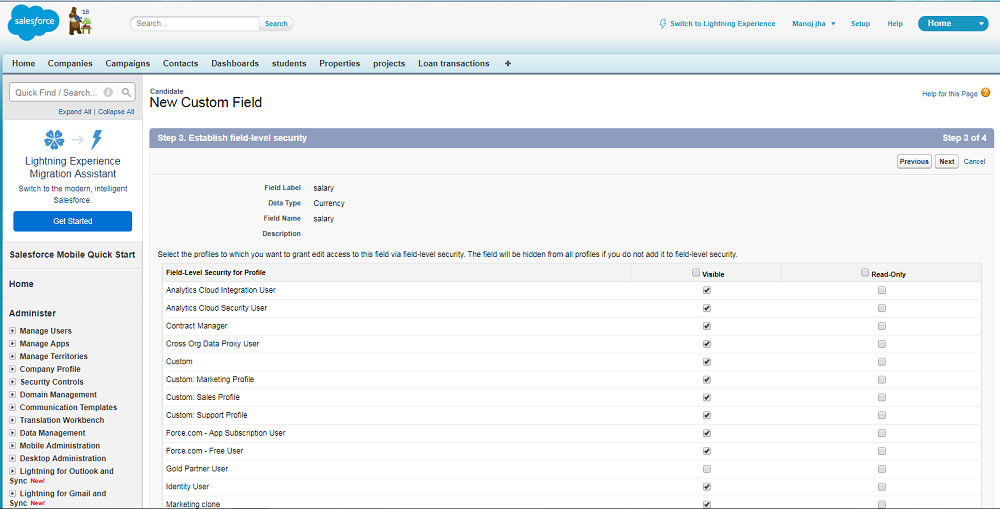
Step 3;- Establish field- level security, select the profile to which we want to grant edit access to this field via field- level security.
Step 4;- Add to page layouts, select the page layouts that should include this field.
Click on "Save" button to create a field successfully.
click on Your Name ---> Setup ---> App Setup ---> Select the appropriate object ---> Click on
Fields --> In the Custom Fields & Relationships section, click on the New button
For Custom Objects,
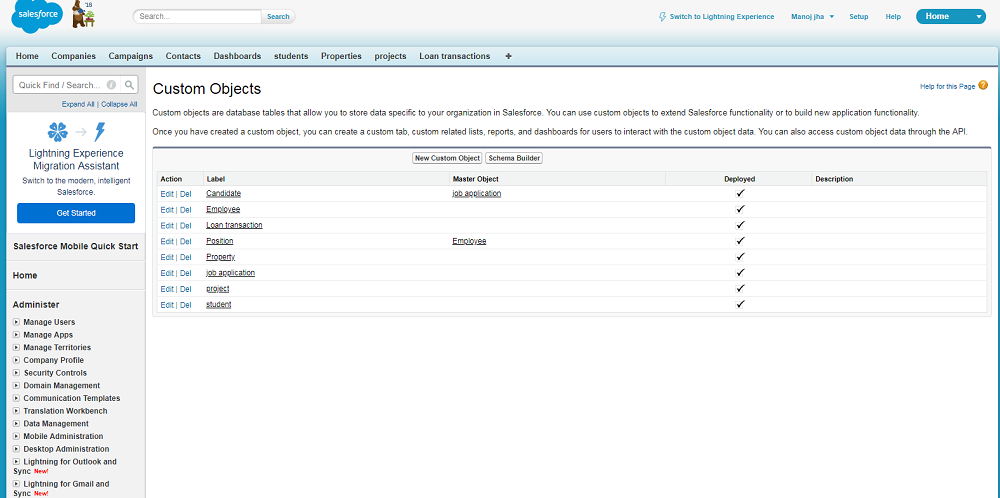
click on Your Name ---> Setup ---> App Setup --->Create ---> Click on Objects --> click on any
object name In the Custom Fields & Relationships section, click on the New button
we can enter upto 18 digits
8. percent;- Allows users to enter a percentage value.
9. Phone;- Allows users to enter any phone number.
10. Picklist;- Allows user to select a value from a list we define.
11. Picklist(Multi select);- The picklist (Multi-select) field allows user to choose more than one picklist value from a set of predefined text values.
12. Text;- Allow user to enter any combination of letters and numbers
13. Text Area;- Allow user to enter any combination of letters and numbers on separate lines.
14. Text Area(Long);- The Text Area(Long) provides for the storage of upto 32,768 characters that display on separarte lines
15. URL;- Allows users to enter any valid website address.
16.Text(Encrypted);- Allows users to enter any combination of letters and numbers and store then in encrypted form.
Step 2;-
1. Give the Field label with meaningful name, once you click Tab, then Field Name will be automatically populated from the label .
enter the description for the field which describes about the purpose of using that field.
Help Text;- It is possible to add field level help to a custom field to provide information to users on how to use that field.
Step 3;- Establish field- level security, select the profile to which we want to grant edit access to this field via field- level security.
Step 4;- Add to page layouts, select the page layouts that should include this field.
Click on "Save" button to create a field successfully.
Fields:
For Standard Objects,click on Your Name ---> Setup ---> App Setup ---> Select the appropriate object ---> Click on
Fields --> In the Custom Fields & Relationships section, click on the New button
For Custom Objects,
click on Your Name ---> Setup ---> App Setup --->Create ---> Click on Objects --> click on any
object name In the Custom Fields & Relationships section, click on the New button


No comments